

If you’re moving from an earlier version of VxWorks to VxWorks 7 you might be wondering: how do I build a bootrom? This post explains how the boot mechanism has changed for VxWorks 7 and what that means particularly for projects based on custom-designed hardware. You should read this if you’re going to migrate a Board Support Package from an earlier version of VxWorks.
The VxWorks 4/5/6 Boot Process
For as long as I can remember before working with VxWorks 7, the VxWorks boot process was the same: the so-called VxWorks “bootrom” lived in flash memory and would run auotmatically from reset. The bootrom initialised all the hardware needed to run VxWorks, and then loaded the VxWorks system — typically in an ELF file — into memory and launched it. The bootrom could load the VxWorks image from a file system, including suitably-formatted flash memory, or from another machine via a network connection.
As it happened, the bootrom was a special build of VxWorks with an built-in application whose job was just to load the “main” VxWorks system image. This special build included the code to bring the processor out of reset and bootstrap the system into a working state; usually this included setting up clocks, pin multiplexing, memory controllers and the like. Another special feature of the bootrom was that it was “ROMable” and could be installed in flash memory.
Although that approach worked quite well, it had some problems:
- If you were developing a BSP for custom-designed hardware, there was a “chicken and egg” problem: you needed a working BSP before you had a working bootrom, and you (usually) needed a working bootrom before you could test and debug the BSP.
- As Systems-on-Chip (SoCs) integrated more capabilities, the process of initialising the hardware grew far more complicated and was sometimes not well documented by silicon vendors.
- SoCs began to include their own built-in boot code which supported booting from different types of memory including NOR flash, SD cards, etc. This made it more difficult for a VxWorks BSP to build a bootrom which would work with the SoC boot code in all the possible use cases.
What’s Changed in VxWorks 7?
Although the overall process of booting VxWorks 7 is similar to older versions, the details have changed significantly. The main differences are:
- VxWorks itself no longer includes ROMable code to run directly from reset and bootstrap the system.
- VxWorks 7 uses a Linux-style device tree to define the hardware; the device tree usually needs to be loaded into memory as a binary “blob” before the VxWorks kernel starts up.
Perhaps obviously, VxWorks 7 no longer supports building an old-style bootrom (or any form of ROMable VxWorks image). Instead, the hardware must have an independent boot loader installed to run from reset and bootstrap the system.
If you’re using a commercial, off-the-shelf hardware design the boot loader is most likely to be U-Boot. Many manufacturers such as NXP ship evaluation boards with U-Boot installed as it’s widely-used and very capable. For example, it can boot other operating systems such as Linux.
But what if you’re building a system based on custom-designed hardware and don’t want to port U-Boot to that hardware? One option is to use Wind River‘s new VxWorks boot loader, VxBL.
What is VxBL?
VxBL is a stripped-down, stand-alone primary boot loader that can be installed in flash memory so that it runs from reset. After initialising the processor and memory sub-systems, its job is to identify a subsequent program, load it into main memory, and launch it. As part of this process, VxBL can also load a separate device tree “blob” identifying the system hardware configuration.
VxBL is supported on ARM and PowerPC targets. It can load programs from various forms of flash memory or FAT32-formatted SD cards, and recognises programs stored as U-Boot images or ELF files; unlike the VxWorks 6.9 bootrom, VxBL is not based on the VxWorks kernel and doesn’t support a network stack.
One nice feature is that VxBL can use the U-Boot image header to identify a compressed program, which it will automatically uncompress while loading into main memory. This can be very useful if space for the program image is limited, although it mean the system will take a little longer to start.
Implementing and Building VxBL
If you plan to use VxBL on your custom-designed hardware, you should first take a look at Wind River’s VxWorks 7 Boot Loader User’s Guide. This includes a chapter named Booting with VxBL which describes how to create and build a VxBL project. Although the VxBL project can be created in Wind River Workbench, it’s really a traditional command-line based Makefile project which builds a standalone, “bare metal” binary image ready to be programmed into flash memory.
Naturally, some parts of VxBL will need to be tailored for your custom target hardware. These include the initialiation code (romInit.s), general board-specific routines (bootLib.c) and a Makefile. As usual, the best way to develop these is to copy and paste files from a Wind River sample implementation of VxBL for similar hardware — ideally based on the same processor.
VxBL is configured using a Linux-style configuration file; as you might expect, the configuration options include details such as memory addresses and sizes which must be chosen to suit your hardware. You can configure VxBL to automatically boot a program located at a fixed address in flash memory, or in a named file on an SD card. Alternatively it can provide a limited, interactive command interpreter, which can be useful while you’re testing the boot strategy.
To install VxBL on your target hardware you’ll need a way to program the binary code into flash memory; this might require use of a JTAG probe and debugger, or similar. This will also help you to test and debug VxBL, especially the early initialisation routines which run before there is any way to output text to a serial console.
VxBL Boot Strategies
One strategy would be to use VxBL to directly boot the VxWorks system image your product will run. This might well include the application, directly linked into a single image.
That strategy is a good replacement for the “ROMable VxWorks” approach supported by earlier versions of VxWorks. As before, you can choose to compress the image to save space or leave it uncompressed to reduce boot time.
But what if you’d prefer to keep something similar to the old VxWorks bootrom, with the flexibility to load a VxWorks image across a network connection? In that case, you can use a VxWorks 7 boot application (“boot app”).
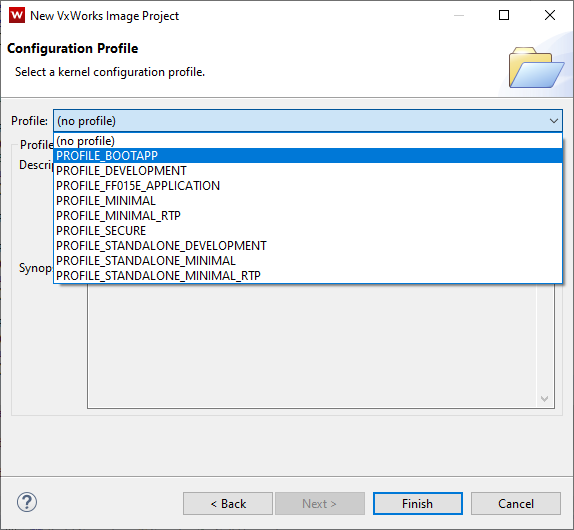
The VxWorks 7 boot app essentially takes the code from the old VxWorks bootrom and links it with the VxWorks 7 kernel. This gives you something that does the same job as the old bootrom, but — crucial difference — can’t run directly from reset. You can build a boot app simply by creating a VxWorks Image Project and selecting the PROFILE_BOOTAPP profile:
Using VxBL to load and run a VxWorks 7 boot app, you get the same behaviour and flexibility as you’d have with the old bootrom.
One Last Thing: Warm Re-boot
There’s one more thing you should know about boot strategies if you’re porting a system to VxWorks 7. In earlier versions, you could call reboot() to re-start the VxWorks bootrom, with an argument to tell it whether to do a “cold” or “warm” re-boot. The difference was that for a warm re-boot, the bootrom would not re-initialise memory and could boot using boot parameters set in RAM rather than reading them from non-volatile storage.
This flow is not supported in VxWorks 7. There is still a distinction between “cold” and “warm” re-boot, but the terms don’t mean what they used to. A cold re-boot means a hardware reset (if this can be initiated by software) — the CPU resets and the entire boot sequence starts again from scratch.
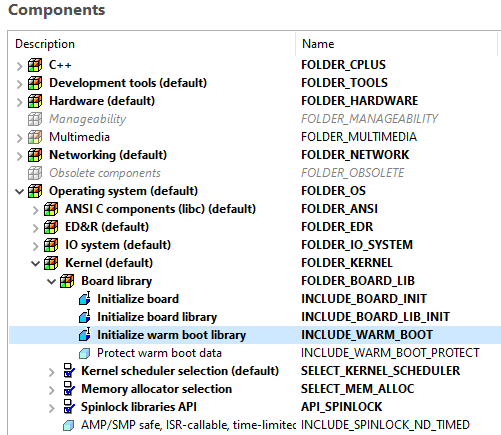
The warm re-boot is something quite new, though: VxWorks 7 will re-start the operating system without re-loading it — in fact, the boot loader won’t run at all. (The only thing that is re-loaded is the initialised data section, which VxWorks has copied during the previous start-up.) This gives the opportunity to re-start very quickly when there’s no need to load a different version of the operating software. You can enable this new warm re-boot mechanism by defining INCLUDE_WARM_BOOT in your VxWorks Image Project:
Conclusion
Although initially it might be a shock to see that there’s no bootrom, in some ways the VxWorks 7 boot strategy is a better fit for modern hardware and allows re-use of standard boot loaders such as U-Boot, where this is convenient. On the other hand, by using VxBL you can still support custom hardware designs, and can closely replicate the “ROMable VxWorks” and bootrom-based boot mechanisms used by earlier versions of VxWorks.
Let me know in the comments how you think the VxWorks 7 boot strategies affect your migration from earlier versions of VxWorks. Do you feel they give you more flexibility?


Leave A Comment